

1. Placement Groups
▶ Sometimes you want to control over the EC2 Instance placement strategy
▶ That strategy can be defined using placement groups
▶ When you create a placement group, you specify one of the following strategies for the group:
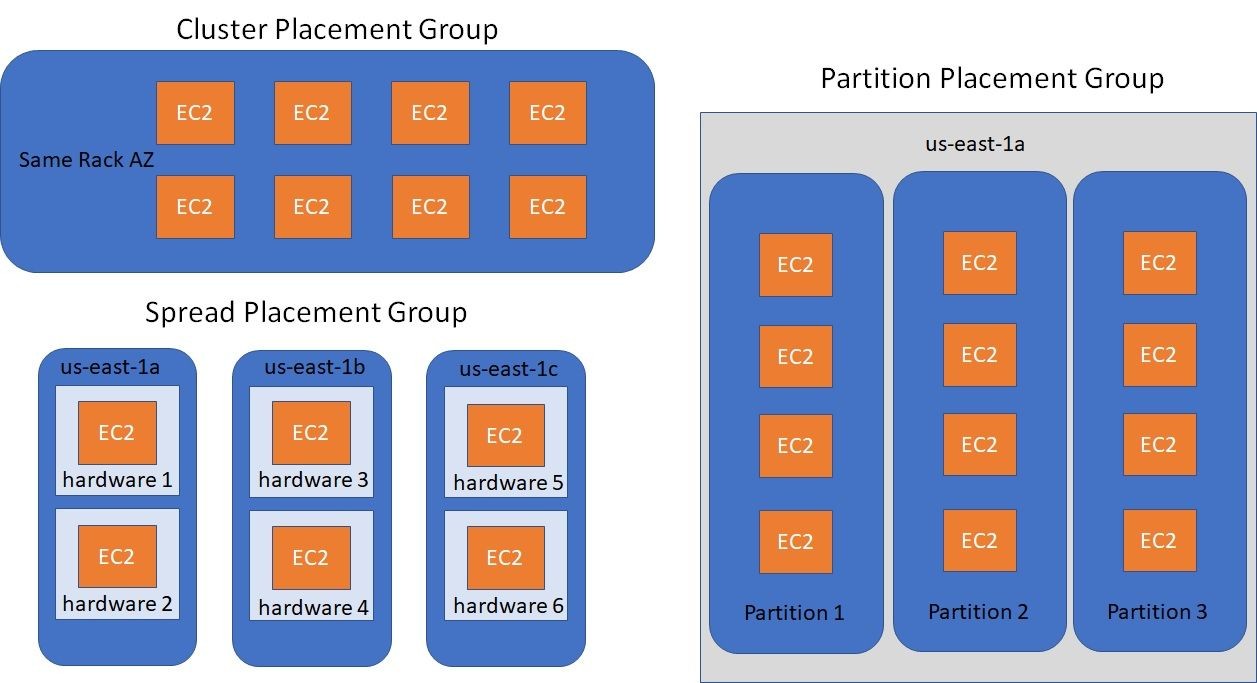
- Cluster: clusters instances into a low-latency group in a single Availability Zone
- Spread: spreads instances across underlying hardware (max 7 instances per group per AZ) - critical applications
- Partition: spreads instances across many different partitions (which rely on different sets of racks) within an AZ, Scales to 100s of EC2 instances per group (Hadoop, Cassaandra, Kafka)

배치그룹이란 AWS에서 EC2 인스턴스의 배치를 결정하는 방식으로, 직접 하드웨어와 상호작용하지 않지만 배치 전략을 지정할 수 있다.
1. 클러스터 배치 그룹 (Cluster Placement Group)
▶ 단일 가용 영역(AZ) 내에서 짧은 지연 시간, 높은 네트워크 성능을 제공하도록 인스턴스를 배치
▶ HPC(High Performance Computing) 워크로드, 기계 학습, 빅데이터 처리에 적합
▶ 인스턴스간의 거리를 매우 가깝게 해서 네트워크 성능을 극대화 하는 방법
2. 분산 배치 그룹 (Spread Placement Group)
▶ 인스턴스를 각기 다른 하드웨어 랙에 배치하여 장애 발생 시 영향을 최소화
▶ 제한사항: 가용 영역(AZ)별로 최대 7개 인스턴스
▶ 중요한(Critical) 애플리케이션을 실행할 때 사용
▶ 인스턴스간의 거리를 매우 멀리 설정해서 영향과 간섭을 최소화
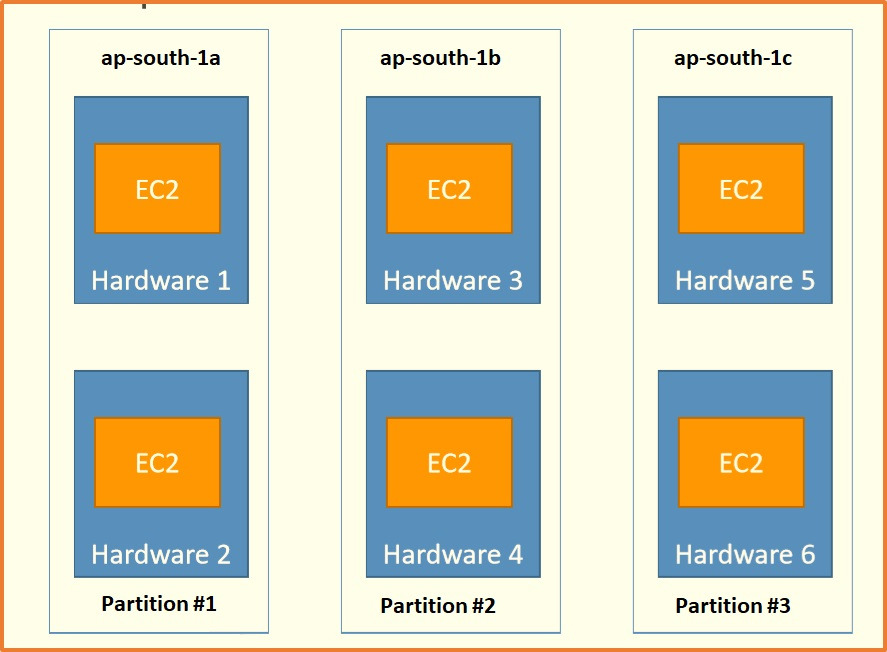
3. 분할 배치 그룹 (Partition Placement Group)
▶ 여러 파티션(Partition) 에 인스턴스를 분산 배치하여 특정 하드웨어 장애로부터 격리
▶ 각 파티션은 서로 다른 하드웨어 랙에 위치하지만, 동일 파티션 내에서는 격리되지 않음
▶ 수백 개의 EC2 인스턴스로 확장 가능
▶ Hadoop, Cassandra, Kafka 같은 분산 시스템에 적합
1-1. Placement Groups Cluster
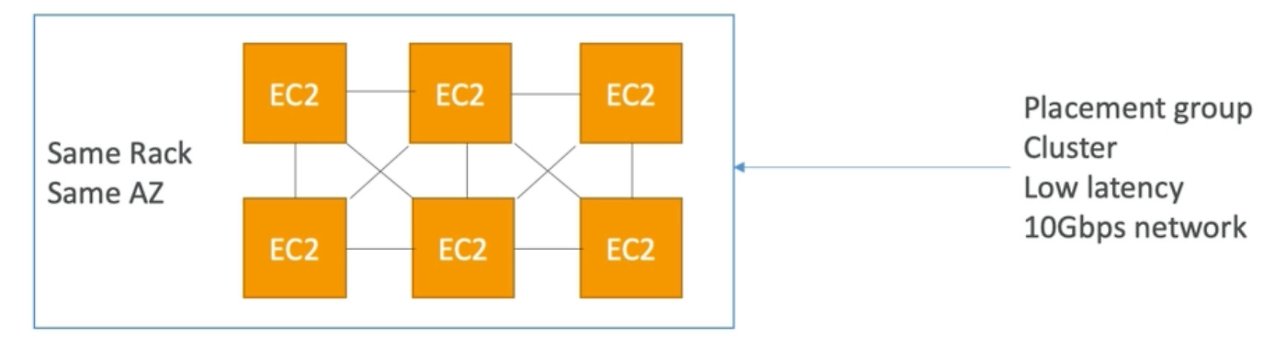
▶ All your EC2 intances are going to be in the same AZ
▶ Pros:
- Great network (10Gbps bandwidth between instances with Enhanced Networking enabled - recommanded)
- 모든 인스턴스 간에 초당 약 10기가바이트의 대역폭을 확보하기 때문에 향상된 네트워킹을 활성화 할 수 있다. 따라서 지연 시간이 짧고 처리량이 많은 네트워크를 확보할 수 있다. 그래서 어떤 종류의 계산 작업에서도 뛰어난 성능을 얻을 수 있다.
▶ Cons:
- If the AZ fails, all instances fails at the same time
▶ Use case:
- Big Data job that needs to complete fast
- Application that needs extremely low latency and high network throughput
1-2. Placement Groups Spread
▶ Pros:
- Can span across Availability Zone (AZ)
- Reduced risk is simultaneous failure
- EC2 Instances are on different physical hardware
▶ Cons:
- Limited to 7 instances per AZ per placement group
▶ Use case:
- Application that needs to maximize high availability
- Critical Applications where each instance must be isolated from failure from each other
1-3. Placements Groups Partition

▶ Each partition represent a hardware rack in AWS
▶ Up to 7 partitions per AZ
▶ Can span across multiple AZs in the same region
▶ Up to 100s of EC2 instances
▶ The instances in a partition do not share racks with the instances in the other partitions
▶ A partition failure can affect many EC2 but won't affect other partitions
▶ EC2 instances get across to the partition information as metadata
▶ Use cases: 파티션을 인식하는 빅데이터 애플리케이션 such as HDFS, HBase, Cassandra, Kafka
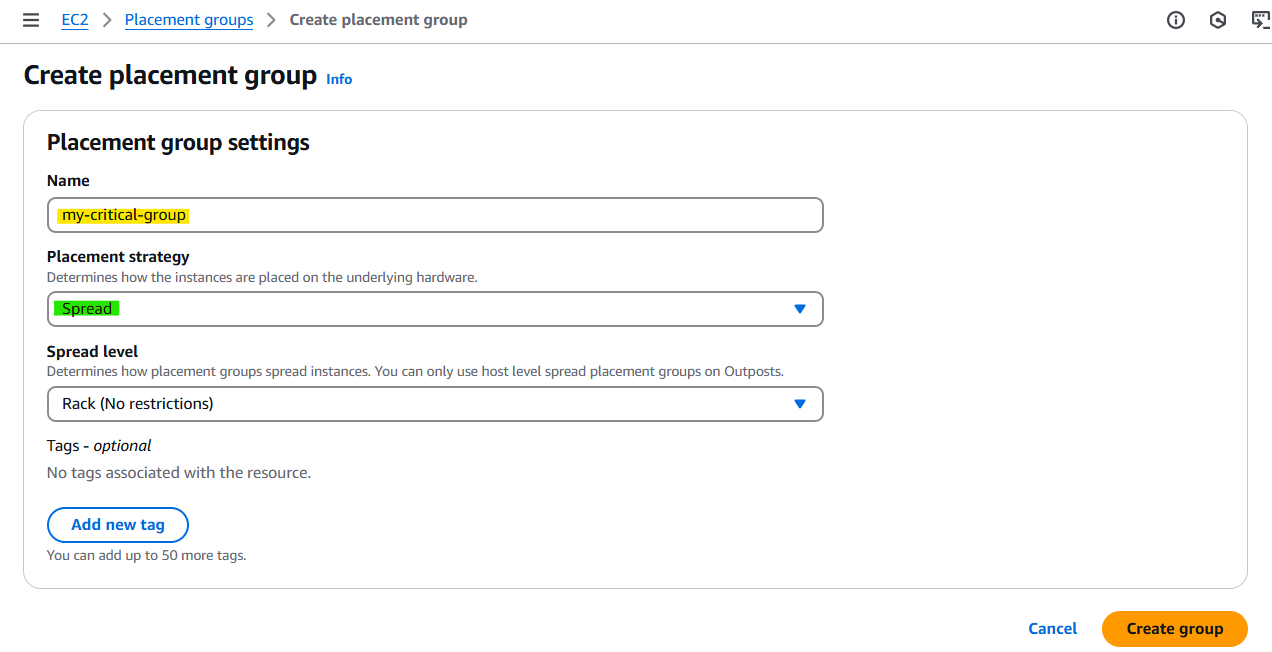
1-4. 배치그룹 실습
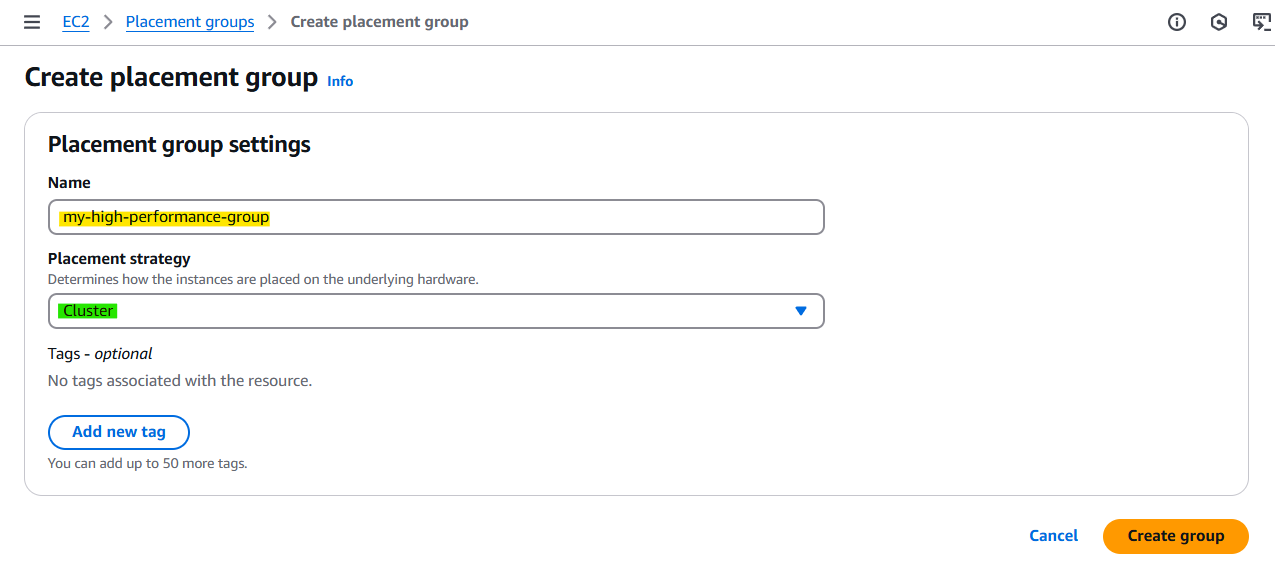
✅ How to create placement group
- AWS 콘솔 → EC2 → "Placement groups" → "Create placement group"
- AWS CLI → aws ec2 create-placement-group --group-name my-group --strategy cluster
- Terraform → resource "aws_placement_group" "example" { name = "my-group" strategy = "cluster" }


✅ How to launch Instances in a group
AWS 콘솔 로그인 → EC2 대시보드 이동 → 왼쪽 메뉴에서 "인스턴스 시작(Launch Instances)" 클릭 → Advanced Detail 탭 → Placement group name 에서 설정

2. Elastic Network Interfaces (ENI)
2-1. What's ENI?
▶ Logical component in a VPC that represents a virtual network card
▶ The ENI can have the following attributes:
- Primary private IPv4, one or more secondary IPv4
- One Elastic IP (IPv4) per private IPv4
- One Public IPv4
- One or more security groups
- A MAC addres
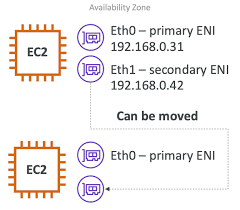
▶ You can create ENI independently and attach them on the fly (move them) on EC2 instasnces for failover
▶ Bound to a specific availabity zone (AZ)
⭐ 기본 ENI(Virtual Network Card)인 Eth0에 연결되어 EC2 네트워크 연결을 제공
- Primary Private IP, 1개 이상 Secondary IP
- Private IP 당 1개의 Elastic IP
- 1개의 Public IP
- 1개 이상의 Security Group 연결
- MAC Address
- EC2 인스턴스와 독립적으로 생성하고 즉시 연결하거나, Failover 위해 EC2 인스턴스에서 이동 가능
- 특정 AZ에 종속되어 있음
📌 서버를 유지보수하거나 장애 조치(Failover)가 필요할 때, ENI를 다른 EC2 인스턴스로 이동하여 같은 Private Static IP를 유지할 수 있음. 즉, 같은 Application을 가동중인 EC2 인스턴스가 두 개 있고, Private IPv4를 통해 다른 인스턴스로 엑세스하려면 ENI만 옮기면 된다.
🔹 문제상황 예시
기본 구성
- EC2-1 인스턴스(현재 운영 중)
- ENI-1 (Private IP: 10.0.1.100)이 EC2-1에 연결됨
문제 발생
- EC2-1이 장애 발생(예: 하드웨어 문제, 소프트웨어 충돌)
- ENI 이동 (Failover)
- EC2-1에서 ENI-1을 분리 (Detach)
- ENI-1을 EC2-2(대기 서버)에 연결 (Attach)
결과
- EC2-2는 그대로 10.0.1.100을 사용 (새로운 IP 변경 없이 기존 서비스 유지)
- 클라이언트는 변경 없이 기존 서버에 계속 접속 가능
🔹 ENI 이동 명령어 (AWS CLI)
# 기존 EC2-1에서 ENI 분리
aws ec2 detach-network-interface --attachment-id eni-attach-12345678

# 새로운 EC2-2에 ENI 연결
aws ec2 attach-network-interface --network-interface-id eni-12345678 --instance-id i-23456789 --device-index 1
2-2. ENI 실습
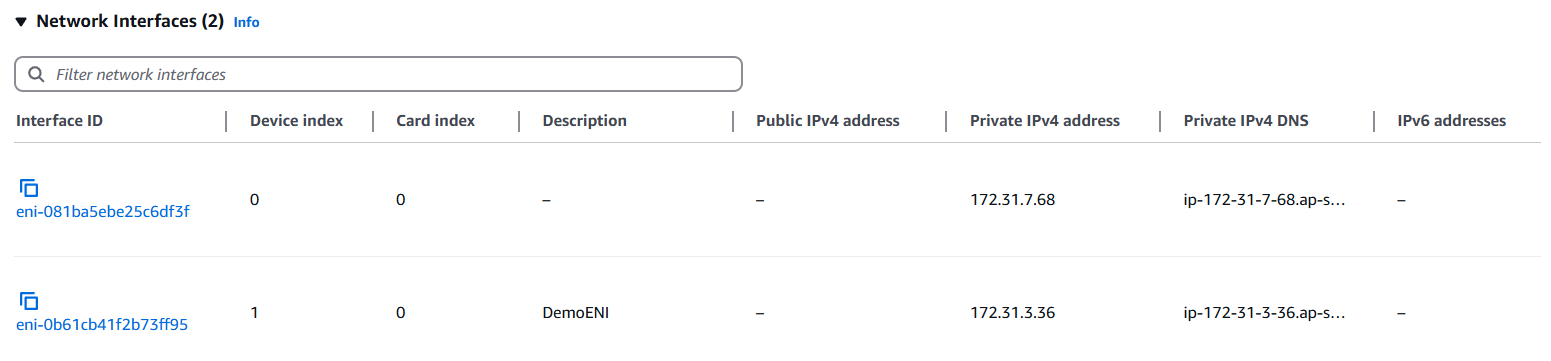
먼저 인스턴스 2개를 런칭한다.
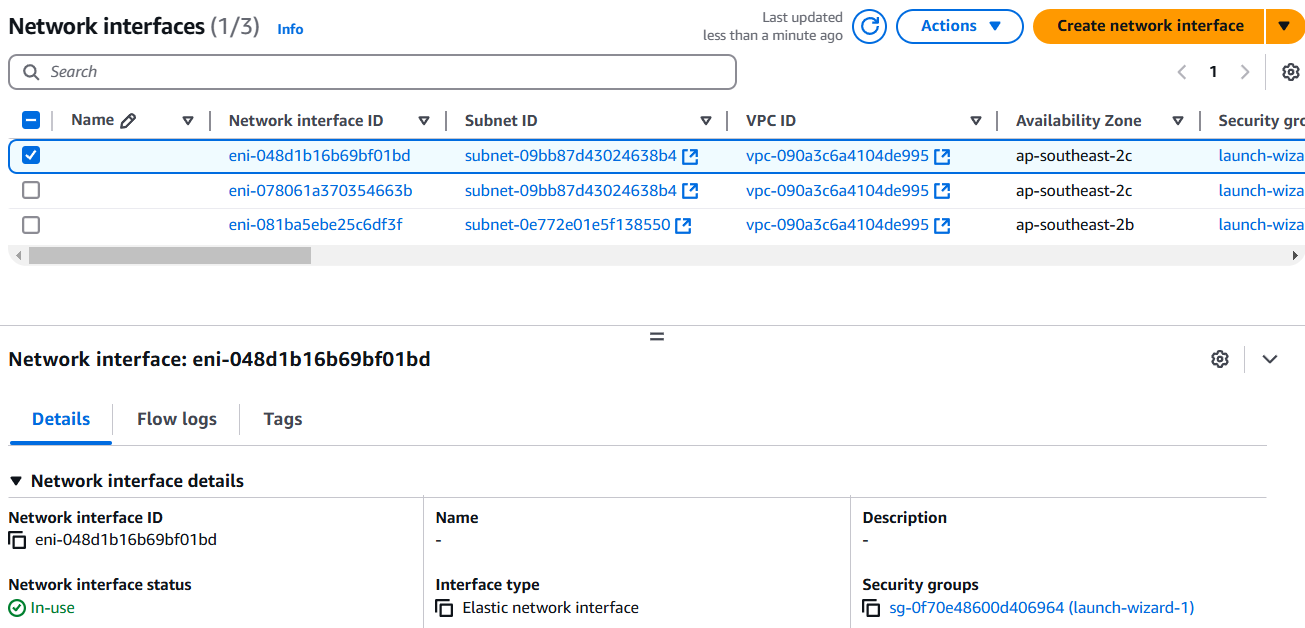
AWS 콘솔 로그인 → EC2 대시보드 이동 → 왼쪽 메뉴에서 Instances 클릭 → 네트워크 이름 클릭 → 하단 보드에서 Networking 선택하고 Scroll down → Network Interfaces 🚀


각 인스턴스에는 하나의 네트워크 인터페이스가 있는데 인터페이스 ID는 eni-로 시작하고, 공용IP, 사설IP, 그리고 IPv4 DNS를 여기서 확인 가능하다. 그리고 생성한 두 개의 인스턴스는 서로 다른 Network Interfaces를 가진다.
✅ How to check the information of the created Network Interfaces
AWS 콘솔 로그인 → EC2 대시보드 이동 → 왼쪽 메뉴 중 Network & Security에서 Network Interfaces 선택 🚀

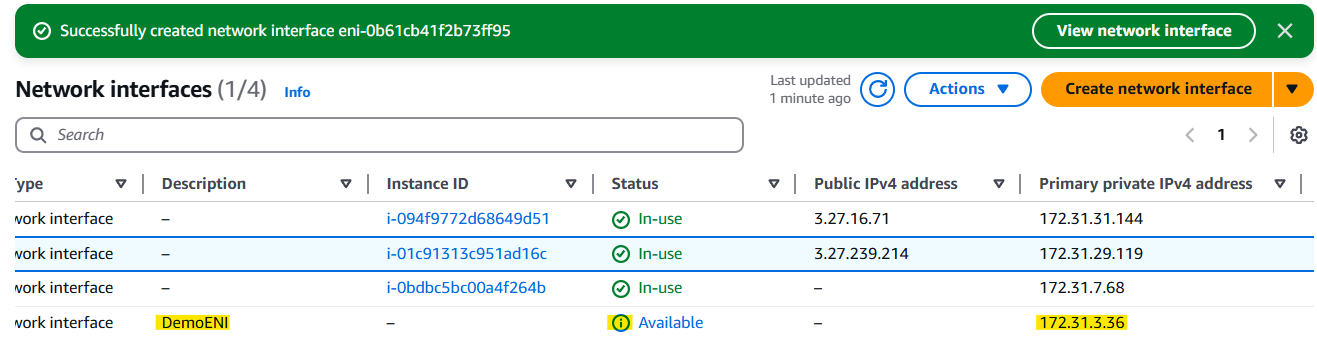
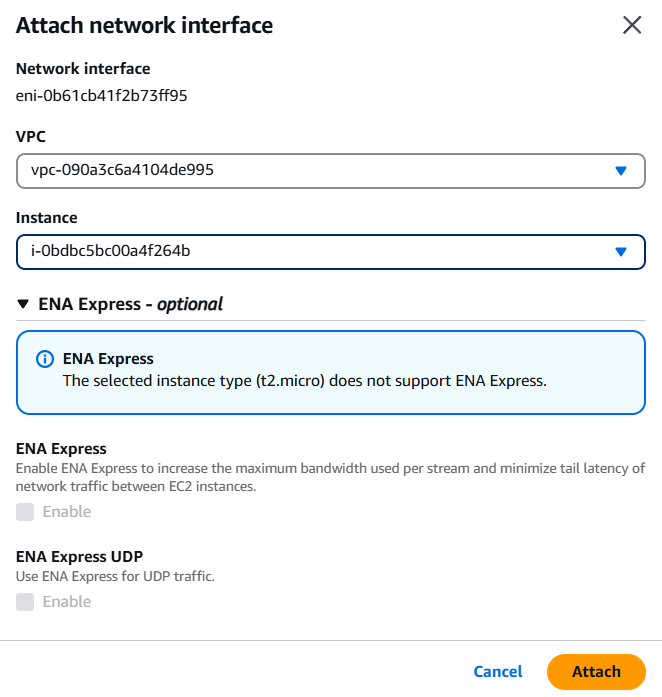
✅ How to create network interface and attach to an Instance
AWS 콘솔 로그인 → EC2 대시보드 이동 → 왼쪽 메뉴 중 Network & Security에서 Network Interfaces 선택 → Create Network Interface → 생성한 인터페이스 클릭 → 상단에 Actions ▼ → Attach → VPC 와 인스턴스명 지정 후 Attach 🚀
- 이 인스턴스에는 설명을 덧붙일 수 있다.


생성 후 보드로 돌아오면 DemoENI 가 Available 상태로 생성된 것과 보조 Private IPv4가 생성된 것을 확인 할 수 있다.

✅ How to move ENI to another Instance
AWS 콘솔 로그인 → EC2 대시보드 이동 → 왼쪽 메뉴 중 Network & Security에서 Network Interfaces 선택 → 인터페이스aud 클릭 → 상단에 Actions ▼ → Detach 🚀 → 상단에 Actions ▼ → Attach → VPC 와 인스턴스명 지정 후 Attach 🚀


💡 EC2 인스턴스를 종료하면?
기본 네트워크 인터페이스(eth0)는 기본적으로 자동으로 삭제된다. 왜냐하면 "Terminate 시 삭제" 옵션이 활성화되어 있기 때문이다. 그러나 직접 생성한 네트워크 인터페이스(Secondary ENI)는 인스턴스 종료 후에도 자동으로 삭제되지 않고 남아있다. 추가 ENI는 다른 인스턴스에 재연결할 수 있고, 필요 시 수동으로 삭제해야 한다.
💡 ENI 에 대해 더 알고 싶다면? (정리 잘 된 블로그)
New – Elastic Network Interfaces in the Virtual Private Cloud | Amazon Web Services
If you look closely at the services and facilities provided by AWS, you’ll see that we’ve chosen to factor architectural components that were once considered elemental (e.g. a server) into multiple discrete parts that you can instantiate and control in
aws.amazon.com
3. EC2 Hibernate (절전모드)
We know we can stop, terminate instances
- Stop - the data on disk (EBS) is kept intact in the next start
- Terminate - any EBS volumes (root) also set-up to be destroyed is lost
On start, the following happens:
- First start: the OS boots & the EC2 User Data script is run
- Following starts: the OS boots up
- Then your application starts, caches get warmed up, and that can take time!
3-1. What's Hibernate?
▶ The in-memory (RAM) state is preserved
▶ The instance boot is much faster! (the OS is not stopped / restarted - it's frozen!)
▶ Under the hood: the RAM state is written to a file in the root EBS volume
▶ The root EBS volume must be encrypted
▶ Use cases:
- Long-running processing
- Saving the RAM state
- Services that take time to initialize

예를 들어, 실행중인 EC2 인스턴스가 있다. RAM에는 데이터가 있다. 절전모드를 켜면 실행 중인 인스턴스는 중지 상태로 전환되고 RAM의 내용은 EBS 볼륨에 덤프된다. 그리고 인스턴스를 종료하면 RAM이 사라진다. 하지만 EBS 볼륨에는 여전히 RAM이 덤프되어 있으니 인스턴스를 다시 실행하면 디스크에서 RAM을 불러와 EC2 인스턴스 메모리로 가져간다.
이렇게 하면 EC2 인스턴스를 중지한 적이 없는 것처럼 사용 할 수 있다.
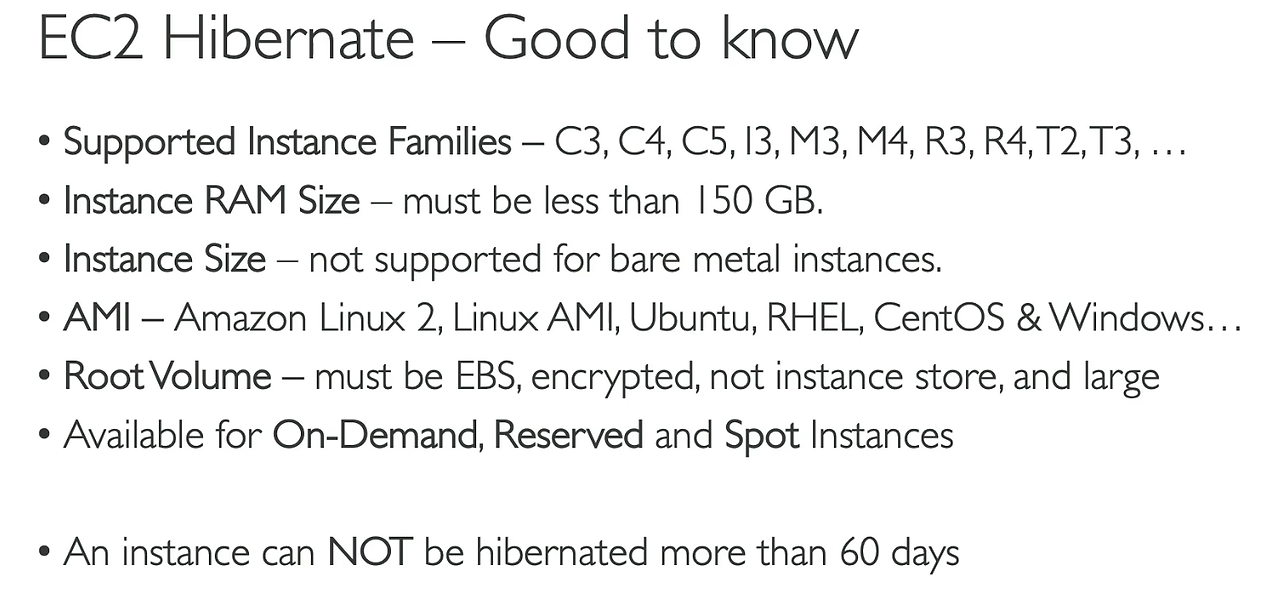
⭐ Hibernate 주의사항 - 인스턴스 유형 제한 / EBS 루트 볼륨 / 스왑 공간 필요
- Hibernate 기능은 일부 인스턴스 유형에서만 지원된다. 예를 들어, M, C, R 시리즈의 인스턴스는 지원 됨
- Hibernate 기능을 사용하려면 인스턴스의 루트 볼륨이 EBS여야 한다.
- 인스턴스가 메모리 상태를 저장할 수 있는 충분한 EBS 스토리지가 필요하다. 기본적으로 RAM 크기의 두 배만큼의 스왑 공간이 필요함.
- 루트 EBS 볼륨은암호화되어있어야 한다.
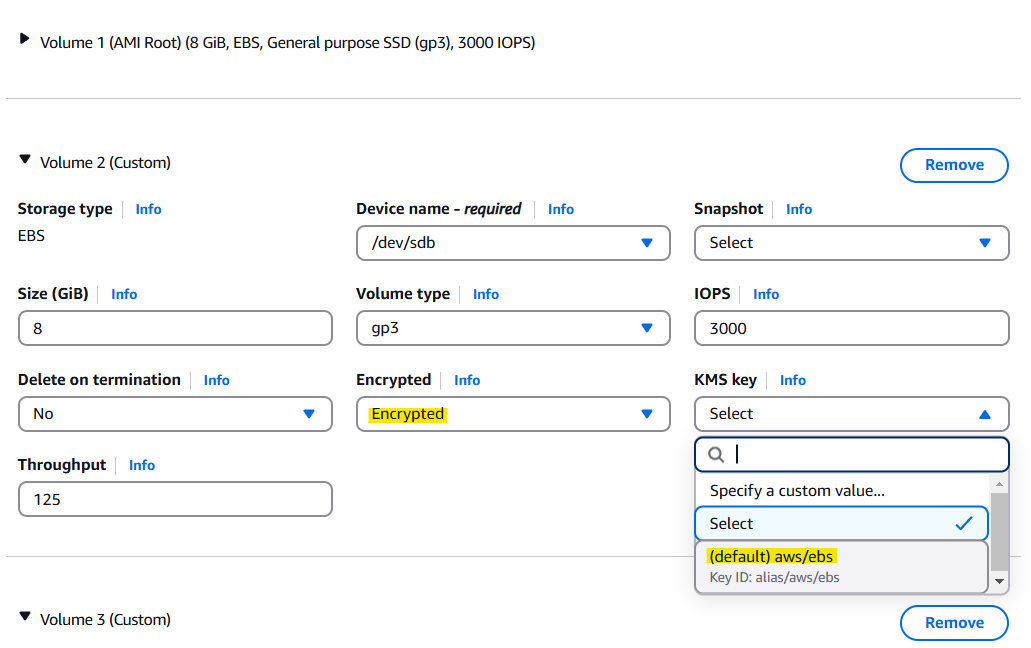
3-2. Hibernate 실습
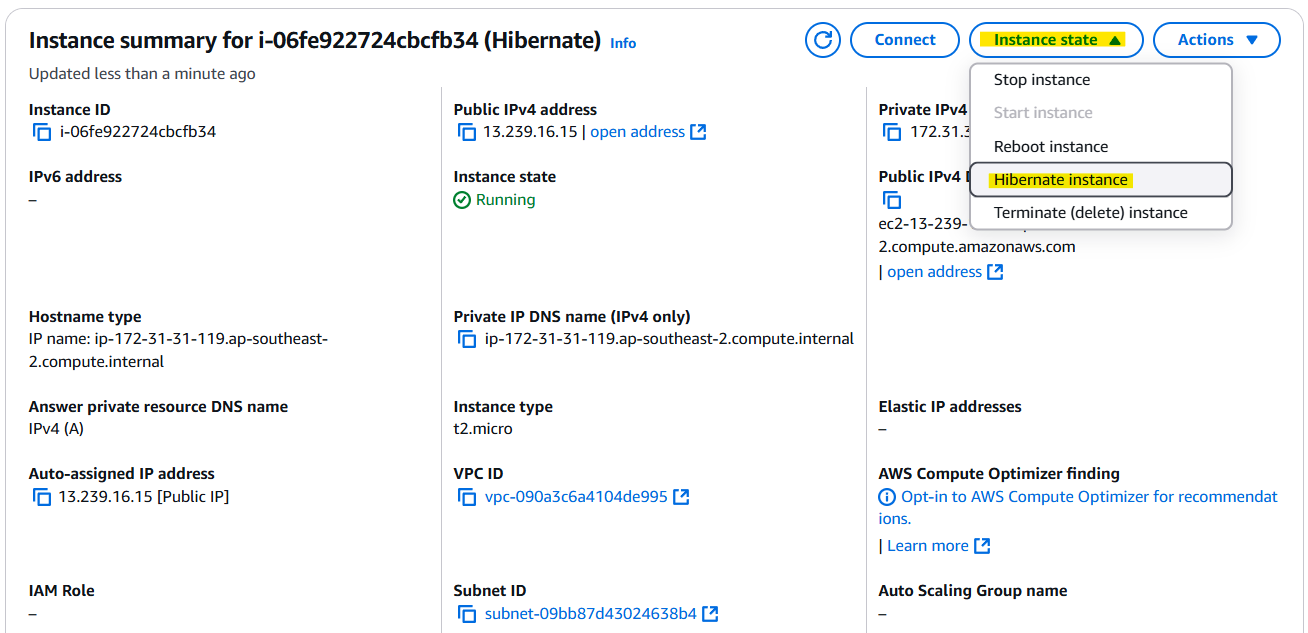
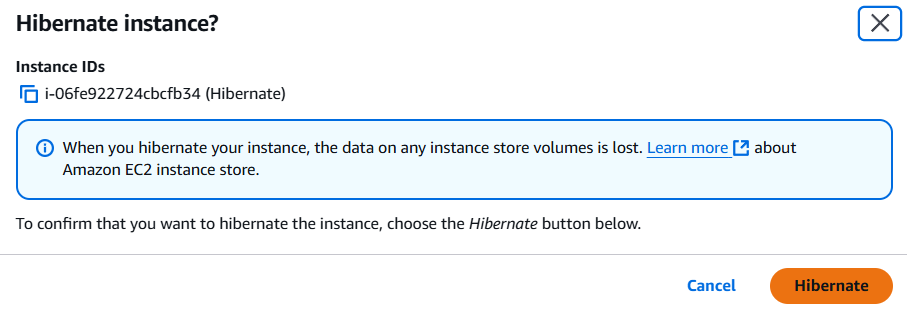
AWS 콘솔 로그인 → EC2 대시보드로 이동 → Launch Instance → Stop - Hibernate behavior → Enable로 변경하기 🚀
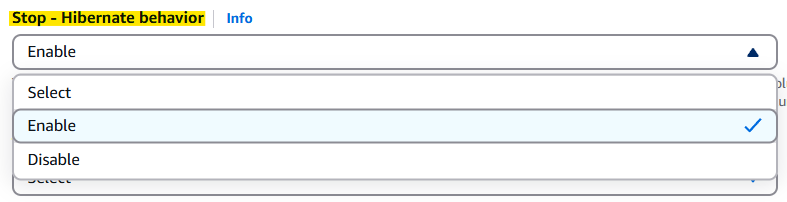
→ Configure storage → Advanced → Add new volume → Encrypted 설정을 Yes로 바꾸기 → KMS는 기본 값인 awg/ebs로 지정 → Instances 에서 인스턴스명 클릭 → 우측 상단 Instance state → Hibernate Instance

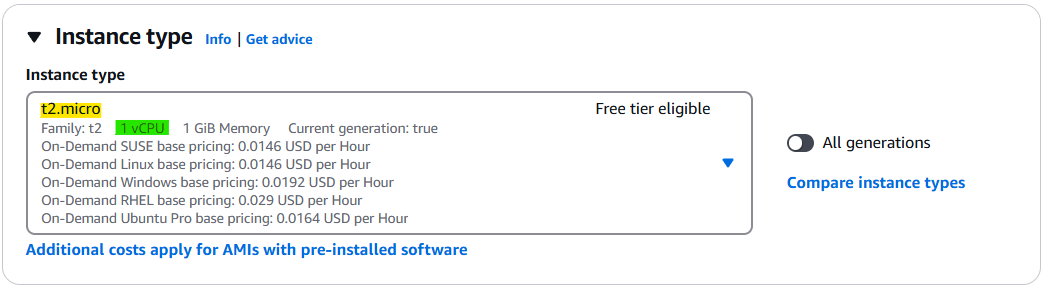
Storage Size는 8GiB Volume 이면 t2.micro에 충분하다.
왜? Launch Instance 할 때 Instance type 탭에서 확인 가능!
✅ AWS CLI 에서 Hibernate 기능을 활성화 하는 법
인스턴스를 시작할 때 --hibernate 옵션을 사용한다.
aws ec2 start-instances --instance-ids i-1234567890abcdef0 --hibernate
인스턴스를 중지할 때는 Shutdown을 하더라도, Hibernate를 설정해 두었다면 메모리 상태가 EBS에 저장된다.
aws ec2 stop-instances --instance-ids i-1234567890abcdef0 --hibernate이제 Hibernate된 인스턴스를 재시작하면, 중지되기 전 상태 그대로 복구된다.
⭐ Hibernate 잘 작동하는지 확인법⭐
그냥 단순하게 생각해서 aws 콘솔에서 uptime 명령어로 확인 가능 하다.
`uptime` 명령어는 시스템의 가동 시간을 확인하는 데 사용된다. 이 명령어를 실행하면 시스템이 부팅된 이후부터 현재까지의 시간, 시스템의 평균 로드(load average), 그리고 현재 시스템의 시간 등을 출력한다.
$ uptime
14:15:23 up 5 days, 3:47, 3 users, load average: 0.25, 0.30, 0.20▶ 현재 시간: 14:15:23 — 시스템의 현재 시간
▶ 업타임 (up): up 5 days, 3:47 — 시스템이 부팅된 후 5일 3시간 47분 동안 계속 실행 중
▶ 사용자 수: 3 users — 시스템에 현재 로그인한 사용자 수
▶ 로드 평균 (load average): 0.25, 0.30, 0.20 — 시스템의 1분, 5분, 15분 평균 로드 값
💡 로드 평균 (Load Average)
1분, 5분, 15분 평균 로드는 시스템의 CPU와 디스크에 대한 최근의 요청 수를 나타내며, 값이 높을수록 시스템이 과부하 상태일 수 있음을 나타낸다.
Hibernate 하기 전에 인스턴스를 실행하고 uptime 명령어를 찍어보자. 여기서 1분이 나왔다고 가정해 보자.
만약에 Hibernate 를 하지 않고 인스턴스를 중지했다가 다시 실행했다면 ?
uptime 명령어는 0분으로 리셋되었다가, 다시 시작하는 시간이 측정될 것이다. 시스템이 완전히 종료되었기 때문에 가동 시간이 초기화된다.
일반적인 중지/시작과는 달리, Hibernate는 시스템의 가동 시간을 중단 없이 계속 이어 나갈 수 있는 방식이다. 그래서 Hibernate 를 하면 시간이 멈추지 않은 것처럼 계속된 시간이 표시된다. 시스템이 Hibernate 상태에서 메모리 내용을 저장하고, 그 상태로 복원되기 때문에 이전에 실행된 시간도 그대로 유지되는 것이고. 이로 인해 시스템은 마치 중지되지 않은 것처럼 동작한다. 즉, 운영체제가 보기에는 이 인스턴스는 한 번도 중지된 적이 없기 때문에 1분 이상의 시간이 찍힐 것이다.
'AWS' 카테고리의 다른 글
1. Placement Groups
▶ Sometimes you want to control over the EC2 Instance placement strategy
▶ That strategy can be defined using placement groups
▶ When you create a placement group, you specify one of the following strategies for the group:
- Cluster: clusters instances into a low-latency group in a single Availability Zone
- Spread: spreads instances across underlying hardware (max 7 instances per group per AZ) - critical applications
- Partition: spreads instances across many different partitions (which rely on different sets of racks) within an AZ, Scales to 100s of EC2 instances per group (Hadoop, Cassaandra, Kafka)
배치그룹이란 AWS에서 EC2 인스턴스의 배치를 결정하는 방식으로, 직접 하드웨어와 상호작용하지 않지만 배치 전략을 지정할 수 있다.
1. 클러스터 배치 그룹 (Cluster Placement Group)
▶ 단일 가용 영역(AZ) 내에서 짧은 지연 시간, 높은 네트워크 성능을 제공하도록 인스턴스를 배치
▶ HPC(High Performance Computing) 워크로드, 기계 학습, 빅데이터 처리에 적합
▶ 인스턴스간의 거리를 매우 가깝게 해서 네트워크 성능을 극대화 하는 방법
2. 분산 배치 그룹 (Spread Placement Group)
▶ 인스턴스를 각기 다른 하드웨어 랙에 배치하여 장애 발생 시 영향을 최소화
▶ 제한사항: 가용 영역(AZ)별로 최대 7개 인스턴스
▶ 중요한(Critical) 애플리케이션을 실행할 때 사용
▶ 인스턴스간의 거리를 매우 멀리 설정해서 영향과 간섭을 최소화
3. 분할 배치 그룹 (Partition Placement Group)
▶ 여러 파티션(Partition) 에 인스턴스를 분산 배치하여 특정 하드웨어 장애로부터 격리
▶ 각 파티션은 서로 다른 하드웨어 랙에 위치하지만, 동일 파티션 내에서는 격리되지 않음
▶ 수백 개의 EC2 인스턴스로 확장 가능
▶ Hadoop, Cassandra, Kafka 같은 분산 시스템에 적합
1-1. Placement Groups Cluster
▶ All your EC2 intances are going to be in the same AZ
▶ Pros:
- Great network (10Gbps bandwidth between instances with Enhanced Networking enabled - recommanded)
- 모든 인스턴스 간에 초당 약 10기가바이트의 대역폭을 확보하기 때문에 향상된 네트워킹을 활성화 할 수 있다. 따라서 지연 시간이 짧고 처리량이 많은 네트워크를 확보할 수 있다. 그래서 어떤 종류의 계산 작업에서도 뛰어난 성능을 얻을 수 있다.
▶ Cons:
- If the AZ fails, all instances fails at the same time
▶ Use case:
- Big Data job that needs to complete fast
- Application that needs extremely low latency and high network throughput
1-2. Placement Groups Spread
▶ Pros:
- Can span across Availability Zone (AZ)
- Reduced risk is simultaneous failure
- EC2 Instances are on different physical hardware
▶ Cons:
- Limited to 7 instances per AZ per placement group
▶ Use case:
- Application that needs to maximize high availability
- Critical Applications where each instance must be isolated from failure from each other
1-3. Placements Groups Partition
▶ Each partition represent a hardware rack in AWS
▶ Up to 7 partitions per AZ
▶ Can span across multiple AZs in the same region
▶ Up to 100s of EC2 instances
▶ The instances in a partition do not share racks with the instances in the other partitions
▶ A partition failure can affect many EC2 but won't affect other partitions
▶ EC2 instances get across to the partition information as metadata
▶ Use cases: 파티션을 인식하는 빅데이터 애플리케이션 such as HDFS, HBase, Cassandra, Kafka
1-4. 배치그룹 실습
✅ How to create placement group
- AWS 콘솔 → EC2 → "Placement groups" → "Create placement group"
- AWS CLI → aws ec2 create-placement-group --group-name my-group --strategy cluster
- Terraform → resource "aws_placement_group" "example" { name = "my-group" strategy = "cluster" }
✅ How to launch Instances in a group
AWS 콘솔 로그인 → EC2 대시보드 이동 → 왼쪽 메뉴에서 "인스턴스 시작(Launch Instances)" 클릭 → Advanced Detail 탭 → Placement group name 에서 설정
2. Elastic Network Interfaces (ENI)
2-1. What's ENI?
▶ Logical component in a VPC that represents a virtual network card
▶ The ENI can have the following attributes:
- Primary private IPv4, one or more secondary IPv4
- One Elastic IP (IPv4) per private IPv4
- One Public IPv4
- One or more security groups
- A MAC addres
▶ You can create ENI independently and attach them on the fly (move them) on EC2 instasnces for failover
▶ Bound to a specific availabity zone (AZ)
⭐ 기본 ENI(Virtual Network Card)인 Eth0에 연결되어 EC2 네트워크 연결을 제공
- Primary Private IP, 1개 이상 Secondary IP
- Private IP 당 1개의 Elastic IP
- 1개의 Public IP
- 1개 이상의 Security Group 연결
- MAC Address
- EC2 인스턴스와 독립적으로 생성하고 즉시 연결하거나, Failover 위해 EC2 인스턴스에서 이동 가능
- 특정 AZ에 종속되어 있음
📌 서버를 유지보수하거나 장애 조치(Failover)가 필요할 때, ENI를 다른 EC2 인스턴스로 이동하여 같은 Private Static IP를 유지할 수 있음. 즉, 같은 Application을 가동중인 EC2 인스턴스가 두 개 있고, Private IPv4를 통해 다른 인스턴스로 엑세스하려면 ENI만 옮기면 된다.
🔹 문제상황 예시
기본 구성
- EC2-1 인스턴스(현재 운영 중)
- ENI-1 (Private IP: 10.0.1.100)이 EC2-1에 연결됨
문제 발생
- EC2-1이 장애 발생(예: 하드웨어 문제, 소프트웨어 충돌)
- ENI 이동 (Failover)
- EC2-1에서 ENI-1을 분리 (Detach)
- ENI-1을 EC2-2(대기 서버)에 연결 (Attach)
결과
- EC2-2는 그대로 10.0.1.100을 사용 (새로운 IP 변경 없이 기존 서비스 유지)
- 클라이언트는 변경 없이 기존 서버에 계속 접속 가능
🔹 ENI 이동 명령어 (AWS CLI)
# 기존 EC2-1에서 ENI 분리 aws ec2 detach-network-interface --attachment-id eni-attach-12345678 # 새로운 EC2-2에 ENI 연결 aws ec2 attach-network-interface --network-interface-id eni-12345678 --instance-id i-23456789 --device-index 1
2-2. ENI 실습
먼저 인스턴스 2개를 런칭한다.
AWS 콘솔 로그인 → EC2 대시보드 이동 → 왼쪽 메뉴에서 Instances 클릭 → 네트워크 이름 클릭 → 하단 보드에서 Networking 선택하고 Scroll down → Network Interfaces 🚀
각 인스턴스에는 하나의 네트워크 인터페이스가 있는데 인터페이스 ID는 eni-로 시작하고, 공용IP, 사설IP, 그리고 IPv4 DNS를 여기서 확인 가능하다. 그리고 생성한 두 개의 인스턴스는 서로 다른 Network Interfaces를 가진다.
✅ How to check the information of the created Network Interfaces
AWS 콘솔 로그인 → EC2 대시보드 이동 → 왼쪽 메뉴 중 Network & Security에서 Network Interfaces 선택 🚀
✅ How to create network interface and attach to an Instance
AWS 콘솔 로그인 → EC2 대시보드 이동 → 왼쪽 메뉴 중 Network & Security에서 Network Interfaces 선택 → Create Network Interface → 생성한 인터페이스 클릭 → 상단에 Actions ▼ → Attach → VPC 와 인스턴스명 지정 후 Attach 🚀
- 이 인스턴스에는 설명을 덧붙일 수 있다.
생성 후 보드로 돌아오면 DemoENI 가 Available 상태로 생성된 것과 보조 Private IPv4가 생성된 것을 확인 할 수 있다.
✅ How to move ENI to another Instance
AWS 콘솔 로그인 → EC2 대시보드 이동 → 왼쪽 메뉴 중 Network & Security에서 Network Interfaces 선택 → 인터페이스aud 클릭 → 상단에 Actions ▼ → Detach 🚀 → 상단에 Actions ▼ → Attach → VPC 와 인스턴스명 지정 후 Attach 🚀
💡 EC2 인스턴스를 종료하면?
기본 네트워크 인터페이스(eth0)는 기본적으로 자동으로 삭제된다. 왜냐하면 "Terminate 시 삭제" 옵션이 활성화되어 있기 때문이다. 그러나 직접 생성한 네트워크 인터페이스(Secondary ENI)는 인스턴스 종료 후에도 자동으로 삭제되지 않고 남아있다. 추가 ENI는 다른 인스턴스에 재연결할 수 있고, 필요 시 수동으로 삭제해야 한다.
💡 ENI 에 대해 더 알고 싶다면? (정리 잘 된 블로그)
New – Elastic Network Interfaces in the Virtual Private Cloud | Amazon Web Services
If you look closely at the services and facilities provided by AWS, you’ll see that we’ve chosen to factor architectural components that were once considered elemental (e.g. a server) into multiple discrete parts that you can instantiate and control in
aws.amazon.com
3. EC2 Hibernate (절전모드)
We know we can stop, terminate instances
- Stop - the data on disk (EBS) is kept intact in the next start
- Terminate - any EBS volumes (root) also set-up to be destroyed is lost
On start, the following happens:
- First start: the OS boots & the EC2 User Data script is run
- Following starts: the OS boots up
- Then your application starts, caches get warmed up, and that can take time!
3-1. What's Hibernate?
▶ The in-memory (RAM) state is preserved
▶ The instance boot is much faster! (the OS is not stopped / restarted - it's frozen!)
▶ Under the hood: the RAM state is written to a file in the root EBS volume
▶ The root EBS volume must be encrypted
▶ Use cases:
- Long-running processing
- Saving the RAM state
- Services that take time to initialize
예를 들어, 실행중인 EC2 인스턴스가 있다. RAM에는 데이터가 있다. 절전모드를 켜면 실행 중인 인스턴스는 중지 상태로 전환되고 RAM의 내용은 EBS 볼륨에 덤프된다. 그리고 인스턴스를 종료하면 RAM이 사라진다. 하지만 EBS 볼륨에는 여전히 RAM이 덤프되어 있으니 인스턴스를 다시 실행하면 디스크에서 RAM을 불러와 EC2 인스턴스 메모리로 가져간다.
이렇게 하면 EC2 인스턴스를 중지한 적이 없는 것처럼 사용 할 수 있다.
⭐ Hibernate 주의사항 - 인스턴스 유형 제한 / EBS 루트 볼륨 / 스왑 공간 필요
- Hibernate 기능은 일부 인스턴스 유형에서만 지원된다. 예를 들어, M, C, R 시리즈의 인스턴스는 지원 됨
- Hibernate 기능을 사용하려면 인스턴스의 루트 볼륨이 EBS여야 한다.
- 인스턴스가 메모리 상태를 저장할 수 있는 충분한 EBS 스토리지가 필요하다. 기본적으로 RAM 크기의 두 배만큼의 스왑 공간이 필요함.
- 루트 EBS 볼륨은암호화되어있어야 한다.
3-2. Hibernate 실습
AWS 콘솔 로그인 → EC2 대시보드로 이동 → Launch Instance → Stop - Hibernate behavior → Enable로 변경하기 🚀
→ Configure storage → Advanced → Add new volume → Encrypted 설정을 Yes로 바꾸기 → KMS는 기본 값인 awg/ebs로 지정 → Instances 에서 인스턴스명 클릭 → 우측 상단 Instance state → Hibernate Instance
Storage Size는 8GiB Volume 이면 t2.micro에 충분하다.
왜? Launch Instance 할 때 Instance type 탭에서 확인 가능!
✅ AWS CLI 에서 Hibernate 기능을 활성화 하는 법
인스턴스를 시작할 때 --hibernate 옵션을 사용한다.
aws ec2 start-instances --instance-ids i-1234567890abcdef0 --hibernate
인스턴스를 중지할 때는 Shutdown을 하더라도, Hibernate를 설정해 두었다면 메모리 상태가 EBS에 저장된다.
aws ec2 stop-instances --instance-ids i-1234567890abcdef0 --hibernate이제 Hibernate된 인스턴스를 재시작하면, 중지되기 전 상태 그대로 복구된다.
⭐ Hibernate 잘 작동하는지 확인법⭐
그냥 단순하게 생각해서 aws 콘솔에서 uptime 명령어로 확인 가능 하다.
uptime 명령어는 시스템의 가동 시간을 확인하는 데 사용된다. 이 명령어를 실행하면 시스템이 부팅된 이후부터 현재까지의 시간, 시스템의 평균 로드(load average), 그리고 현재 시스템의 시간 등을 출력한다.
$ uptime 14:15:23 up 5 days, 3:47, 3 users, load average: 0.25, 0.30, 0.20
▶ 현재 시간: 14:15:23 — 시스템의 현재 시간
▶ 업타임 (up): up 5 days, 3:47 — 시스템이 부팅된 후 5일 3시간 47분 동안 계속 실행 중
▶ 사용자 수: 3 users — 시스템에 현재 로그인한 사용자 수
▶ 로드 평균 (load average): 0.25, 0.30, 0.20 — 시스템의 1분, 5분, 15분 평균 로드 값
💡 로드 평균 (Load Average)
1분, 5분, 15분 평균 로드는 시스템의 CPU와 디스크에 대한 최근의 요청 수를 나타내며, 값이 높을수록 시스템이 과부하 상태일 수 있음을 나타낸다.
Hibernate 하기 전에 인스턴스를 실행하고 uptime 명령어를 찍어보자. 여기서 1분이 나왔다고 가정해 보자.
만약에 Hibernate 를 하지 않고 인스턴스를 중지했다가 다시 실행했다면 ?
uptime 명령어는 0분으로 리셋되었다가, 다시 시작하는 시간이 측정될 것이다. 시스템이 완전히 종료되었기 때문에 가동 시간이 초기화된다.
일반적인 중지/시작과는 달리, Hibernate는 시스템의 가동 시간을 중단 없이 계속 이어 나갈 수 있는 방식이다. 그래서 Hibernate 를 하면 시간이 멈추지 않은 것처럼 계속된 시간이 표시된다. 시스템이 Hibernate 상태에서 메모리 내용을 저장하고, 그 상태로 복원되기 때문에 이전에 실행된 시간도 그대로 유지되는 것이고. 이로 인해 시스템은 마치 중지되지 않은 것처럼 동작한다. 즉, 운영체제가 보기에는 이 인스턴스는 한 번도 중지된 적이 없기 때문에 1분 이상의 시간이 찍힐 것이다.